Difference between revisions of "Connect-135 QuickStart Wi-microDig"
(Created page with "Connect runs in the background and can be accessed via the menu bar at the top of the screen. When a Wi-microDig is connected via Bluetooth Connect creates a virtual MIDI port...") |
|||
| (12 intermediate revisions by the same user not shown) | |||
| Line 1: | Line 1: | ||
| − | + | 1. Verify that your computer has a Bluetooth adapter by checking the Windows control panel or system tray, where a Bluetooth icon should be visible. | |
| + | 2. [[Wi-microDig-601_QuickStart | Add the Wi-microDig as a Bluetooth device to Windows]]. | ||
| − | [ | + | 3. Start Connect. If you haven't installed the [http://icubex.com/loopmidi LoopMIDI software], Connect will show popup dialogs to direct you to the webpage where to download from. Once this software is installed, Connect runs in the background and can be accessed via the system tray at the bottom right of the screen. |
| − | + | [[File:connect-135_menu_no_devices_with_context.png]] | |
| − | |||
| − | |||
| − | |||
| − | [[File: | ||
| − | |||
| − | |||
| − | |||
| − | |||
| − | |||
| − | |||
| − | |||
| − | |||
| − | |||
| − | |||
| − | |||
| − | |||
| + | 4. The Wi-microDig should have appeared in the device list, if not click on "Refresh" in Connect and/or make sure the Wi-microDig is powered. The blue LED on the Wi-microDig will turn on to indicate that a Bluetooth connection has been made. Once the Wi-microDig is connected via Bluetooth, Connect creates a virtual MIDI port with the name and serial number of that device. | ||
| − | + | [[File:connect-135_digitizer_view_wmd.png]] | |
| − | |||
| − | + | By default, Connect will attempt to connect to your Wi-microDig when it is launched. If you would like to disable auto-connect, turn it off by unchecking the auto-enable checkbox in the digitizer view. | |
| + | To remove the Wi-microDig from the device list (even when it's not connected and enabled), click on "Remove". If you want to use it again, simply click "Refresh". If you can't (re-)connect with a Wi-microDig, it may be necessary to re-create the Outgoing serial port, in the Bluetooth settings under "More bluetooth options", in the tab "COM ports". | ||
| − | + | If you unplug then re-plug the Bluetooth adapter while Connect is running, existing Wi-microDig entries in the device list can't be enabled. Restarting Connect results in new entries in the device list of these Wi-microDigs. Remove the disabled entries that are no longer usable. | |
Latest revision as of 16:49, 13 October 2017
1. Verify that your computer has a Bluetooth adapter by checking the Windows control panel or system tray, where a Bluetooth icon should be visible.
2. Add the Wi-microDig as a Bluetooth device to Windows.
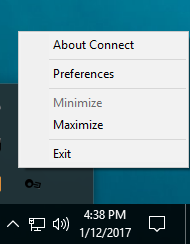
3. Start Connect. If you haven't installed the LoopMIDI software, Connect will show popup dialogs to direct you to the webpage where to download from. Once this software is installed, Connect runs in the background and can be accessed via the system tray at the bottom right of the screen.
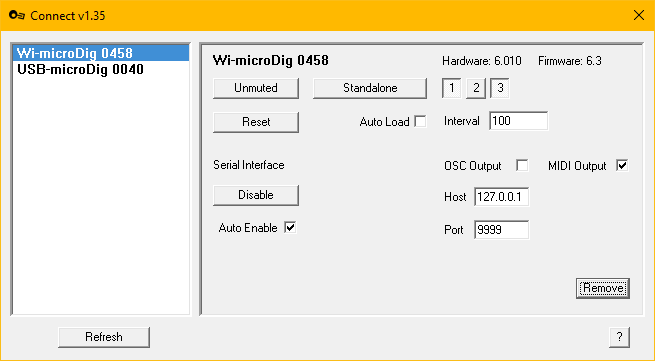
4. The Wi-microDig should have appeared in the device list, if not click on "Refresh" in Connect and/or make sure the Wi-microDig is powered. The blue LED on the Wi-microDig will turn on to indicate that a Bluetooth connection has been made. Once the Wi-microDig is connected via Bluetooth, Connect creates a virtual MIDI port with the name and serial number of that device.
By default, Connect will attempt to connect to your Wi-microDig when it is launched. If you would like to disable auto-connect, turn it off by unchecking the auto-enable checkbox in the digitizer view.
To remove the Wi-microDig from the device list (even when it's not connected and enabled), click on "Remove". If you want to use it again, simply click "Refresh". If you can't (re-)connect with a Wi-microDig, it may be necessary to re-create the Outgoing serial port, in the Bluetooth settings under "More bluetooth options", in the tab "COM ports".
If you unplug then re-plug the Bluetooth adapter while Connect is running, existing Wi-microDig entries in the device list can't be enabled. Restarting Connect results in new entries in the device list of these Wi-microDigs. Remove the disabled entries that are no longer usable.

