Difference between revisions of "OCube Max Plugin-40 QuickStart"
| Line 1: | Line 1: | ||
This QuickStart Assumes you have installed Max already, and downloaded the oCube zip file from our website. | This QuickStart Assumes you have installed Max already, and downloaded the oCube zip file from our website. | ||
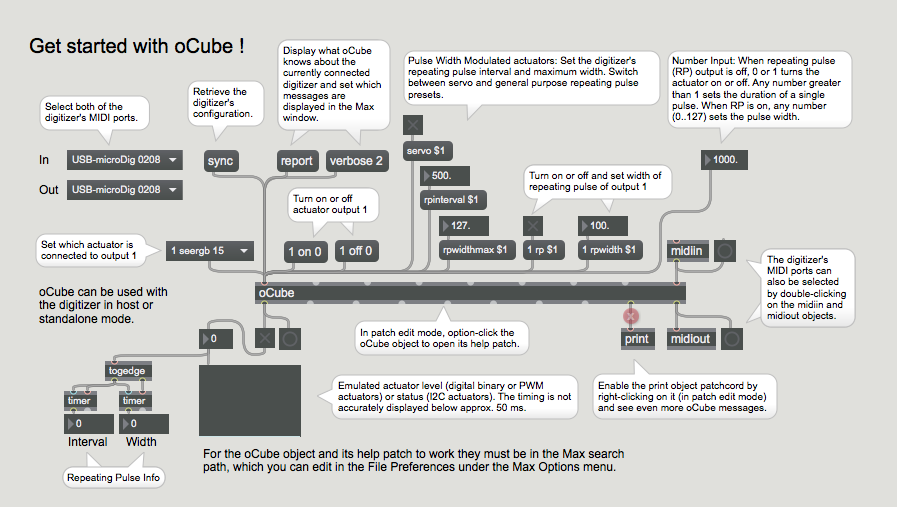
| − | Open the oCube help Max patch | + | Open the oCube help Max patch and select the "get started" tab, or create a Max patch like below. |
| − | [[File:ocube- | + | [[File:ocube-400_ocube_start_max_patch.png]] |
# Select the MIDI ports to which the digitizer is connected or by which it is represented. | # Select the MIDI ports to which the digitizer is connected or by which it is represented. | ||
# Click "sync" and confirm the syncing process in the Max window. | # Click "sync" and confirm the syncing process in the Max window. | ||
| − | # Plug | + | # Plug a binary (i.e two-state) actuator in input 1 of the digitizer. |
# Follow the hints in the Max patch to explore and learn more about oCube. | # Follow the hints in the Max patch to explore and learn more about oCube. | ||
Revision as of 18:29, 28 February 2018
This QuickStart Assumes you have installed Max already, and downloaded the oCube zip file from our website.
Open the oCube help Max patch and select the "get started" tab, or create a Max patch like below.
- Select the MIDI ports to which the digitizer is connected or by which it is represented.
- Click "sync" and confirm the syncing process in the Max window.
- Plug a binary (i.e two-state) actuator in input 1 of the digitizer.
- Follow the hints in the Max patch to explore and learn more about oCube.
