Difference between revisions of "WiDig-800 QuickStart Windows"
| (7 intermediate revisions by the same user not shown) | |||
| Line 1: | Line 1: | ||
===WiDig BLE on Windows=== | ===WiDig BLE on Windows=== | ||
| − | On Windows, configuration of the WiDig must be done through USB, or using the [[WiDig-800_QuickStart_WidiBud| | + | On Windows, configuration of the WiDig must be done through USB, or using the [[WiDig-800_QuickStart_WidiBud|WIDI Bud adapter]]. |
| − | + | To receive sensor data with a generic BLE interface once it is configured in Standalone mode with EditorX, the computer must run Windows 10 or higher. | |
You will need: | You will need: | ||
| Line 11: | Line 11: | ||
- [https://www.tobias-erichsen.de/software/loopmidi.html loopMIDI] virtual MIDI application | - [https://www.tobias-erichsen.de/software/loopmidi.html loopMIDI] virtual MIDI application | ||
| − | - [https://www.microsoft.com/en-us/p/midiberry/9n39720h2m05 MIDIBerry] BLE to MIDI bridge application | + | - [https://www.microsoft.com/en-us/p/midiberry/9n39720h2m05 MIDIBerry] BLE to MIDI bridge application (Windows 10 only) |
| + | |||
| + | Also, we need to route the BLE MIDI port to a virtual MIDI port, hence the need for loopMIDI. | ||
| − | |||
====Pairing the WiDig==== | ====Pairing the WiDig==== | ||
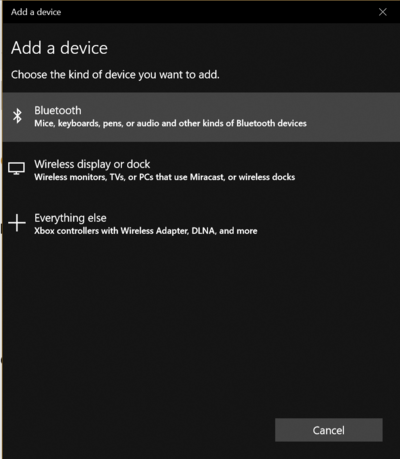
| − | Go to system Settings->Bluetooth & Other Devices, and click on add: | + | '''1.''' Go to system Settings->Bluetooth & Other Devices, and click on add: |
| + | |||
[[File:widig_win10_bluetooth_add.png | 400px ]] | [[File:widig_win10_bluetooth_add.png | 400px ]] | ||
| − | Then, select the WiDig device: | + | |
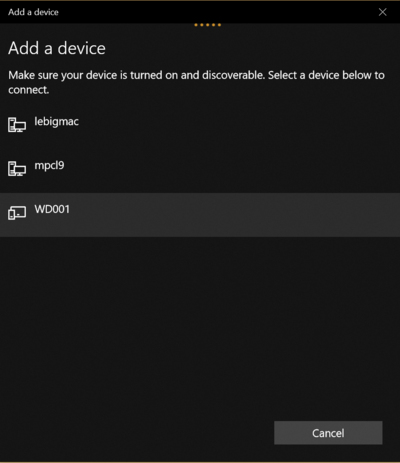
| + | '''2.''' Then, select the WiDig device: | ||
| + | |||
[[File:widig_win10_bluetooth_select.png | 400px]] | [[File:widig_win10_bluetooth_select.png | 400px]] | ||
| − | Connect to the device (If it fails once, try again and eventually it should connect): | + | |
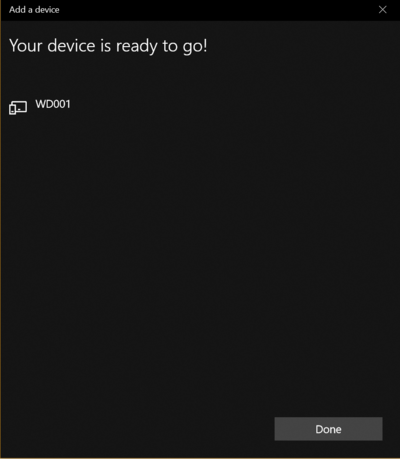
| + | '''3.''' Connect to the device (If it fails once, try again and eventually it should connect): | ||
| + | |||
[[File:widig_win10_bluetooth_ready.png | 400px]] | [[File:widig_win10_bluetooth_ready.png | 400px]] | ||
| − | Make sure loopMIDI is running and there is at least one virtual port available: | + | |
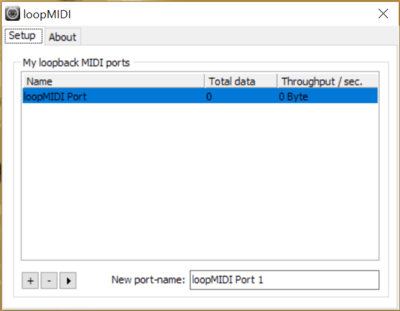
| + | '''4.''' Make sure loopMIDI is running and there is at least one virtual port available: | ||
| + | |||
[[File:widig_win10_loopMIDI.png | 400px]] | [[File:widig_win10_loopMIDI.png | 400px]] | ||
| − | Finally, open MIDIBerry and select the WiDig as input, and the "MIDI" virtual device as output. | + | |
| + | '''5.''' Finally, open MIDIBerry and select the WiDig as input, and the "MIDI" virtual device as output. | ||
Now, you will be able to access WiDig sensor data from any MIDI application via the virtual loopMIDI port! | Now, you will be able to access WiDig sensor data from any MIDI application via the virtual loopMIDI port! | ||
| + | |||
[[File:widig_win10_midiberry.png | 400px]] | [[File:widig_win10_midiberry.png | 400px]] | ||
Latest revision as of 13:02, 31 August 2021
WiDig BLE on Windows
On Windows, configuration of the WiDig must be done through USB, or using the WIDI Bud adapter.
To receive sensor data with a generic BLE interface once it is configured in Standalone mode with EditorX, the computer must run Windows 10 or higher.
You will need:
- A WiDig configured in Standalone mode, and USB power source
- loopMIDI virtual MIDI application
- MIDIBerry BLE to MIDI bridge application (Windows 10 only)
Also, we need to route the BLE MIDI port to a virtual MIDI port, hence the need for loopMIDI.
Pairing the WiDig
1. Go to system Settings->Bluetooth & Other Devices, and click on add:
2. Then, select the WiDig device:
3. Connect to the device (If it fails once, try again and eventually it should connect):
4. Make sure loopMIDI is running and there is at least one virtual port available:
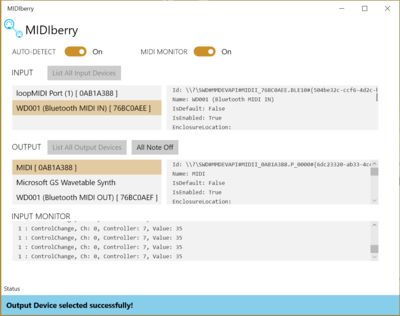
5. Finally, open MIDIBerry and select the WiDig as input, and the "MIDI" virtual device as output.
Now, you will be able to access WiDig sensor data from any MIDI application via the virtual loopMIDI port!
