Difference between revisions of "EditorX-81 QuickStart WiDig Bluetooth"
(Copied from EditorX-80 QuickStart WiDig Bluetooth, revision 3298) |
|||
| (7 intermediate revisions by the same user not shown) | |||
| Line 1: | Line 1: | ||
| + | <embedvideo service="youtube">https://www.youtube.com/watch?v=Cnc24ZiZ58o</embedvideo> | ||
| + | |||
| + | |||
==What you need== | ==What you need== | ||
| Line 12: | Line 15: | ||
The WiDig is pre-configured to communicate via Bluetooth, even though it can still communicate via USB but at MIDI data rate of 31.25 kbps. Once you've successfully connected with EditorX to the WiDig you will be able to set the WiDig to communicate via USB only, at the higher data rate of 115.2 kbps. | The WiDig is pre-configured to communicate via Bluetooth, even though it can still communicate via USB but at MIDI data rate of 31.25 kbps. Once you've successfully connected with EditorX to the WiDig you will be able to set the WiDig to communicate via USB only, at the higher data rate of 115.2 kbps. | ||
| − | On both Windows and MacOS, to communicate via Bluetooth, you'll first need to add the WiDig as a Bluetooth device. The [[WiDig- | + | On both Windows and MacOS, to communicate via Bluetooth, you'll first need to add the WiDig as a Bluetooth device. The [[WiDig-801_QuickStart | WiDig QuickStart]] page explains how to do this. |
| Line 19: | Line 22: | ||
1. Connect the Turn sensor (or any other sensor) to input #1 of the WiDig as shown below, with the red wire on top and the black wire on the bottom. | 1. Connect the Turn sensor (or any other sensor) to input #1 of the WiDig as shown below, with the red wire on top and the black wire on the bottom. | ||
| − | [[File: | + | [[File:WiDig-100.plug.800x640.jpg|300px]] |
| − | 2. Start EditorX. | + | 2. Start EditorX. On MacOS it may be necessary to [https://support.apple.com/en-ca/HT202491 add a security exception] in order to open EditorX. |
| Line 28: | Line 31: | ||
| − | 3. In the [[EditorX- | + | 3. In the [[EditorX-81_Digitizer | Digitizer section]] at the top, choose the WiDig with matching serial number. Upon connecting, the port menu will turn green. If EditorX failed to connect to the WiDig, maybe the Connecting section on the [[EditorX-81_Digitizer | Digitizer]] page can help you resolve the issue. |
| − | [[File:editorx- | + | [[File:editorx-81_digitizer_wd_connected_ble.png|230px]] |
| Line 37: | Line 40: | ||
| − | [[File:editorx- | + | [[File:editorx-81_sensor_inputs_1enabled.png|500px]] |
| − | 5. You're up and running. For further details about using EditorX, refer to the [[EditorX- | + | 5. You're up and running. For further details about using EditorX, refer to the [[EditorX-81 |EditorX help pages]]. |
Latest revision as of 18:22, 21 December 2018
What you need
For this walkthrough, you will need:
- A WiDig.
- A Turn (or other) sensor for testing.
- EditorX software.
Installing the WiDig
The WiDig is pre-configured to communicate via Bluetooth, even though it can still communicate via USB but at MIDI data rate of 31.25 kbps. Once you've successfully connected with EditorX to the WiDig you will be able to set the WiDig to communicate via USB only, at the higher data rate of 115.2 kbps.
On both Windows and MacOS, to communicate via Bluetooth, you'll first need to add the WiDig as a Bluetooth device. The WiDig QuickStart page explains how to do this.
Connecting to the WiDig
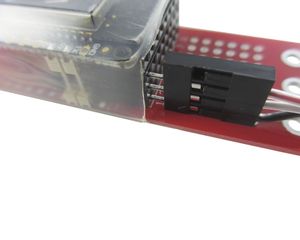
1. Connect the Turn sensor (or any other sensor) to input #1 of the WiDig as shown below, with the red wire on top and the black wire on the bottom.
2. Start EditorX. On MacOS it may be necessary to add a security exception in order to open EditorX.
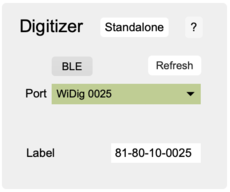
3. In the Digitizer section at the top, choose the WiDig with matching serial number. Upon connecting, the port menu will turn green. If EditorX failed to connect to the WiDig, maybe the Connecting section on the Digitizer page can help you resolve the issue.
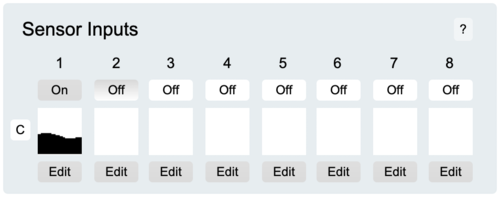
4. Click the "Off" button under number "1" in the Sensor Inputs section to turn on sampling of sensor input 1. The box right below the button will show the sensor value if changed. If it doesn't show anything, click the "Clear" button in the Settings section at the top right of EditorX, and try again to turn on the sensor input.
5. You're up and running. For further details about using EditorX, refer to the EditorX help pages.


