IoCube TD Plugin-10 Intro
The ioCube Touchdesigner plugin, or node, provides a user interface for the processing of sensor data received via an I-CubeX digitizer's inputs, for the control of actuators via an I-CubeX digitizer's outputs, and for the configuration of various settings that apply system-wide to the digitizer.
ioCube user interface
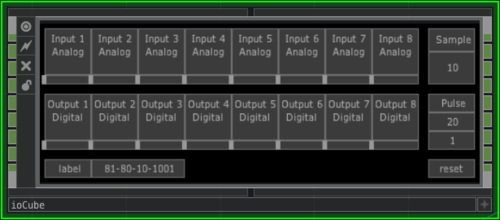
The user interface consists of the parameters shown when the node is selected and the widgets shown in the node view. Both can be controlled by the user but the parameter view offers more detailed control and information. The node view is intended for conveying the digitizer configuration and status at a glance. To interact via the node view user interface, set the node to viewer-active mode by clicking the right-bottom "+" icon.
ioCube ins and outs
The ioCube has inputs for receiving data to control an actuator connected to a digitizer output. The ioCube has outputs that send data representing the sensor values of each sensor connected to a digitizer input. To view the inputs and outputs of the ioCube node disable the viewer-active mode by clicking the right-bottom "+" icon.
Sensor types
Digitizer inputs can process data from analog and digital I2C sensors.
Analog sensors output a voltage. Some sensors only output two voltages representing two captured states such as contact or no contact, motion or no motion, near or far, etc. Other sensors output a very high number of different voltages, limited by the noise level introduced at various stages such as the transmission of the voltage by the cable connecting the sensor to the digitizer, until conversion to a digital representation by the digitizer. The digitizer's resolution limits the number of different voltages and hence sensor states that can be captured. All digitizers have a maximum 10-bit resolution, except for the 32-input Digitizer which has a 12-bit resolution.
I2C sensors are operated by the exchange of pulse trains that represent a series of bytes as commands/messages. Since the sensor data they capture is digitally transmitted the resolution is determined by the sensor and not limited by any cable noise.
Sensor connectors
Analog sensors are connected to a digitizer's sensor inputs using ground (black wire), power (red wire) and the sensor signal (white wire). The sensor signal is connected to the sensor input, available at the 2nd row of the input/output connector, with ground defined as the bottom row and power as the 3rd row.
I2C sensors are connected to a digitizer using four positions of the input/output connector, where ground (bottom or 1st row) is the black wire, power (3rd row) is the red wire, the SCL signal (2nd row) is the white wire, the SDA signal (4th or top row) is the grey wire. WiDigs and recent USB-microDigs require the four positions to be in one column of the input/output connector, whereas older USB-microDigs and the Wi-microDig require the SDA signal (grey wire) to be placed in a separate column to the right (when facing the plug's pins with the ground pin at the bottom) of the SCL wire in the same row as the SCL signal. The 32-input Digitizer is not I2C capable.
Actuator types
Digitizer outputs can operate binary (ie. two-state) actuators, PWM (pulse width modulated) actuators and I2C actuators.
Digital binary actuators are operated by the application of either 0 or 5 V, which then result in either of the two states of the binary actuator. Analog actuators can also be used but can only be set to two states by the application of either 0 or 5 V.
Digital pulse width modulated (PWM) actuators are operated by the application of a repeating pulse of variable width, a special case of which are servos which are usually operated by applying a repeating pulse with an interval of 20 ms and a width between 1 - 2 ms.
I2C actuators are operated by the exchange of pulse trains that represent a series of bytes as commands/messages.
Actuator connectors
Digital binary and PWM actuators are connected to a digitizer with actuator outputs using ground (black wire), power (red wire) and the actuator control (white wire) as follows. The WiDig and USB-microDig actuator controls are available at the 4th (top) row of the input/output connector, with ground defined as the bottom row. The (32-input) Digitizer actuator controls are the 5V power supplies for inputs 25 - 32 of the input/output connector. For Wi-microDigs with firmwares 6.300 - 6.330 the actuator controls are at the same positions on the input/output connector as the sensor inputs. Wi-microDigs with firmware 6.400 or higher do not have any actuator outputs.
I2C actuators are connected to a digitizer using four positions of the input/output connector, where ground (bottom or 1st row) is the black wire, power (3rd row) is the red wire, the SCL signal (2nd row) is the white wire, the SDA signal (4th or top row) is the grey wire. WiDigs and recent USB-microDigs require the four positions to be in one column of the input/output connector, whereas older USB-microDigs and the Wi-microDig require the SDA signal (grey wire) to be placed in a separate column to the right (when facing the plug's pins with the ground pin at the bottom) of the SCL wire in the same row as the SCL signal. The 32-input Digitizer is not I2C capable.
Actuator states
For a digital binary actuator "on" means the state corresponding to logic level "1", ie. when applying 5 V, and "off" means the state corresponding to logic level "0", ie. when applying 0 V.
For an I2C actuator "on" and "off" mean the states that result from specific pulse trains that represent a series of bytes which the actuator interprets as "on" or "off" commands.
The "on" and "off" definitions do not apply to digital PWM actuators.

