Difference between revisions of "Laser Strings"
| Line 25: | Line 25: | ||
==<span id="editor_config"></span>EditorX Configuration== | ==<span id="editor_config"></span>EditorX Configuration== | ||
| − | Now | + | Now its time to set up the sensors to map to MIDI messages. In the example, we emit two parameters: |
| + | |||
| + | 1.) The ReachCloseD's distance value is mapped to pitch bend | ||
| + | |||
| + | 2.) The Flash sensor emits a note on/off pair when the laser light is interrupted | ||
| + | |||
| + | Once set, disconnect the BLE MIDI port through the system menu, or simply unplug and re-power the WiDig: | ||
| + | |||
| + | [[File:Osx-bluetooth-disconnect.png |200px]] | ||
| + | |||
| + | ==Connect in GarageBand== | ||
| + | |||
| + | Follow the iOS instructions in [[WiDig-800_QuickStart|WiDig QuickStart]] to pair and connect to the BLE port. Once connected, you should be able to see the MIDI messages being received by the instrument! In the demo we have used the "Smart Guitar" and "Erhu" instruments. But feel free to experiment with other sounds as well! | ||
| − | + | Some useful CC parameters: | |
| − | + | CC 1 - Modulation | |
| − | + | CC 7 - Volume | |
| − | + | CC 11 - Expression | |
| − | + | Do note that the instruments in GarageBand, unlike a full fledged synthesizer, may not respond to many CC values. The above 3 we have found to work with a number of patches. Other things to try include note on/off messages, and of course pitch bend which works for most instruments. | |
Revision as of 19:55, 27 June 2018
Contents
What you need
For this walkthrough, you will need:
- A WiDig with power supply (USB cable or USB battery pack)
- A Flash sensor
- A ReachCloseD
- A SeeLaser-GreenWide or any laser of your choice
- An iPad (or other iOS device) running GarageBand
Hardware Setup
First, plug in the ReachCloseD into input 1, The Flash into input 2, and the laser into any other slot:
Next, connect the WiDig via a micro-USB cable to a charged USB battery pack, or a USB power supply.
Pairing for Configuration
Follow either the WiDig QuickStart pages for BLE pairing instructions
EditorX Configuration
Now its time to set up the sensors to map to MIDI messages. In the example, we emit two parameters:
1.) The ReachCloseD's distance value is mapped to pitch bend
2.) The Flash sensor emits a note on/off pair when the laser light is interrupted
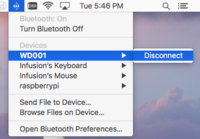
Once set, disconnect the BLE MIDI port through the system menu, or simply unplug and re-power the WiDig:
Connect in GarageBand
Follow the iOS instructions in WiDig QuickStart to pair and connect to the BLE port. Once connected, you should be able to see the MIDI messages being received by the instrument! In the demo we have used the "Smart Guitar" and "Erhu" instruments. But feel free to experiment with other sounds as well!
Some useful CC parameters:
CC 1 - Modulation
CC 7 - Volume
CC 11 - Expression
Do note that the instruments in GarageBand, unlike a full fledged synthesizer, may not respond to many CC values. The above 3 we have found to work with a number of patches. Other things to try include note on/off messages, and of course pitch bend which works for most instruments.

