Difference between revisions of "Link-14 QuickStart"
| Line 18: | Line 18: | ||
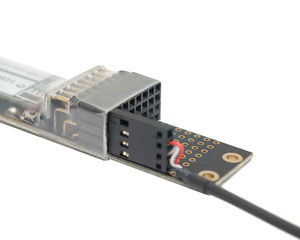
:#Connect the Turn sensor (or any other sensor) to input #1 of the USB-microDig as shown above, with the red wire on top and the black wire on the bottom. | :#Connect the Turn sensor (or any other sensor) to input #1 of the USB-microDig as shown above, with the red wire on top and the black wire on the bottom. | ||
| − | :# | + | :#On Windows, start [[Connect]]. On MacOS it is started automatically when starting Link.The USB-microDig entry with matching serial number should be listed in bold. If you don't see the USB-microDig listed, verify that the driver has been installed. |
:#Launch Link. | :#Launch Link. | ||
:#In the [[Link-14_Digitizer | Digitizer section]] at the top, choose the USB-microDig which serial number matches. Upon connecting, the port menu will turn green. | :#In the [[Link-14_Digitizer | Digitizer section]] at the top, choose the USB-microDig which serial number matches. Upon connecting, the port menu will turn green. | ||
| + | :#Click the "Off" button under number "1" in the Sensors row to turn on sampling of sensor input 1. A number right below the button will appear, which represents the sensor value. | ||
| Line 37: | Line 38: | ||
==Adding the Wi-microDig as a Bluetooth device== | ==Adding the Wi-microDig as a Bluetooth device== | ||
| − | In both Windows and Mac OS X, you'll first need to add the Wi-microDig as a virtual serial (or COM) port. The instructions here explain how to do this. Once this is done, you can continue to the next section. | + | In both Windows and Mac OS X, you'll first need to add the Wi-microDig as a virtual serial (or COM) port. The instructions [http://infusionsystems.com/catalog/info_pages.php?pages_id=236 here] explain how to do this. Once this is done, you can continue to the next section. |
| Line 45: | Line 46: | ||
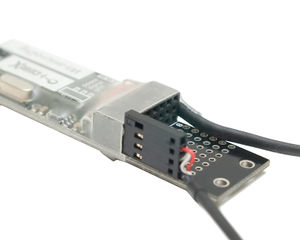
:#Connect the Turn sensor (or any other sensor) to input #1 of the Wi-microDig, as shown above, with the red wire on top and the black wire on the bottom. | :#Connect the Turn sensor (or any other sensor) to input #1 of the Wi-microDig, as shown above, with the red wire on top and the black wire on the bottom. | ||
| − | :# | + | :#On Windows, start [[Connect]] and wait until a message has appeared in Windows System Tray confirming that the Wi-microDig has been recognized by Connect. On MacOS Connect is started automatically when starting Link. |
| − | |||
:#Launch Link. | :#Launch Link. | ||
| + | :#On MacOS, in Connect, enable the Wi-microDig with matching serial number. Once enabled, the blue LED on the Wi-microDig will illuminate and the Wi-microDig entry will be listed in bold. If you don't see the Wi-microDig listed, make sure it was added as a Bluetooth device to the operating system and added in Connect. Once added, click "Refresh" in the Digitizer section in Link. | ||
:#In the [[Link-14_Digitizer | Digitizer section]] at the top, choose the Wi-microDig with matching serial number from the pulldown menu. Upon connecting, the port menu will turn green. If Link doesn't connect to the Wi-microDig, check that your Bluetooth is turned on. Link will not warn you if it is turned off, it will just not connect. | :#In the [[Link-14_Digitizer | Digitizer section]] at the top, choose the Wi-microDig with matching serial number from the pulldown menu. Upon connecting, the port menu will turn green. If Link doesn't connect to the Wi-microDig, check that your Bluetooth is turned on. Link will not warn you if it is turned off, it will just not connect. | ||
| + | :#Click the "Off" button under number "1" in the Sensors row to turn on sampling of sensor input 1. A number right below the button will appear, which represents the sensor value. | ||
Revision as of 16:38, 12 December 2016
Here's how to connect the USB-microDig or Wi-microDig and get sensor data into your computer using Link.
Contents
USB-microDig
What you need
For this walkthrough, you will need:
- A USB-microDig.
- A Turn (or other) sensor for testing.
- Link software.
- Connect software (included in the Link software package).
Connecting to the USB-microDig
- Connect the Turn sensor (or any other sensor) to input #1 of the USB-microDig as shown above, with the red wire on top and the black wire on the bottom.
- On Windows, start Connect. On MacOS it is started automatically when starting Link.The USB-microDig entry with matching serial number should be listed in bold. If you don't see the USB-microDig listed, verify that the driver has been installed.
- Launch Link.
- In the Digitizer section at the top, choose the USB-microDig which serial number matches. Upon connecting, the port menu will turn green.
- Click the "Off" button under number "1" in the Sensors row to turn on sampling of sensor input 1. A number right below the button will appear, which represents the sensor value.
Wi-microDig
What you need
For this walkthrough, you will need:
- A Wi-microDig.
- Bluetooth adapter (likely built in to your computer if it's a Mac).
- A Turn (or other) sensor for testing.
- Link software.
- Connect software (included in the Link software package).
Adding the Wi-microDig as a Bluetooth device
In both Windows and Mac OS X, you'll first need to add the Wi-microDig as a virtual serial (or COM) port. The instructions here explain how to do this. Once this is done, you can continue to the next section.
Connecting to the Wi-microDig
- Connect the Turn sensor (or any other sensor) to input #1 of the Wi-microDig, as shown above, with the red wire on top and the black wire on the bottom.
- On Windows, start Connect and wait until a message has appeared in Windows System Tray confirming that the Wi-microDig has been recognized by Connect. On MacOS Connect is started automatically when starting Link.
- Launch Link.
- On MacOS, in Connect, enable the Wi-microDig with matching serial number. Once enabled, the blue LED on the Wi-microDig will illuminate and the Wi-microDig entry will be listed in bold. If you don't see the Wi-microDig listed, make sure it was added as a Bluetooth device to the operating system and added in Connect. Once added, click "Refresh" in the Digitizer section in Link.
- In the Digitizer section at the top, choose the Wi-microDig with matching serial number from the pulldown menu. Upon connecting, the port menu will turn green. If Link doesn't connect to the Wi-microDig, check that your Bluetooth is turned on. Link will not warn you if it is turned off, it will just not connect.
- Click the "Off" button under number "1" in the Sensors row to turn on sampling of sensor input 1. A number right below the button will appear, which represents the sensor value.

