This document will walk you through the procedure of adding the wi-microDig to your Bluetooth devices list and connecting to the wi-microDig using Max/MSP. For the older version of the plugin, see here.
For this walkthrough, you will need:
Hardware
- A wi-microDig
- Turn sensor (or any other sensor)
- A machine with built-in bluetooth (any recent Mac)
Software
- A working installation of Max/MSP (v5 or v6)
- BlueMIDI
- Virtual MIDI port software, such as loopMIDI.
- iCube external in your Cycling '74/externals folder
- icubex.digitizer placed in the Max5/patches folder
Installing and Using LoopMIDI to create a virtual MIDI port
This document will use LoopMIDI, which you can download
here.
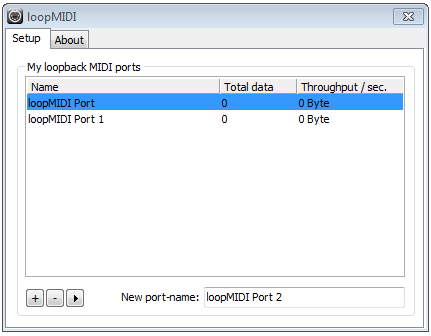
Run the installer, and then double click to launch loopMIDI. It will appear on the bottom of the screen, in the system tray.
-
Start LoopMIDI. Using the "+" button, add two ports, 1 for "IN" and one for "OUT". The window should look like this:
Connecting to the Wi-microDig with BlueMIDI
The first time you use your Wi-microDig, you need to pair it with your computer. After that, BlueMIDI will be able to connect to it at the COM port it has been assigned. You can find the instructions to pair your Wi-microDig
here.
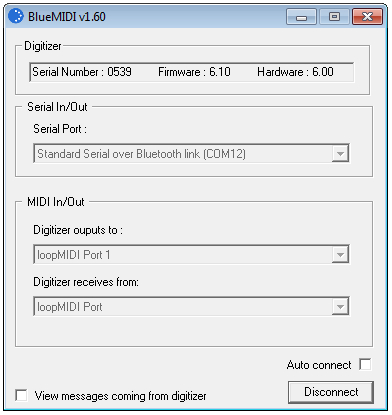
- Open BlueMIDI and select the COM port of your Wi-microDig and click "Connect". You should see the following:
Installing the iCube external
The iCube object talks to the wi-microDig.
You can download it here
Place the icube.mxo file (found in the objects folder within the zip file linked above) in
the folder Cycling '74/externals (Cycling '74/max-externals in Max5).
Using the icubex.digitizer object
Once the icubex.digitizer.maxpat file is placed in the Max5/patches folder, it can be integrated into your own patches. Alternately, if you choose not to put icubex.digitizer into the patches folder, you'll need to place it in the same folder as any patch that includes it.
The icubex.digitizer can be included in your patch, just like any object. Double-clicking on it brings up the patch itself, which has controls for connecting to the I-CubeX digitizer of your choice, and for turning sensor inputs on and off and changing the resolution of the sensor data. If you're using the wi-microDig, you can also control the digital outputs from this patch.
Connecting to the wi-microDig
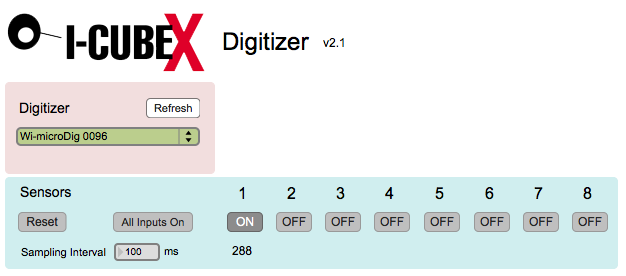
Once you've added icubex.digitizer to your patch, double click on it to see the controls. In the Digitizer section at the top, choose your wi-microDig as indicated by its serial number.
If you don't see the wi-microDig listed, make sure
you've added it as a Bluetooth device following the instructions above..
Upon connecting, the port menu will turn green and the blue LED on the wi-microDig will illuminate.
If the patch doesn't connect to the Wi-microDig, check that your
Bluetooth is turned on. Max/MSP will not warn you if it is turned off, it
will just not connect.
At this point, you can start receiving sensor data. To turn on any of the 8 analog sensor inputs, click on 1 of the 8 toggle
boxes. Next to each of the toggle boxes is a switch to choose between
low-resolution (7-bit) and high-resolution (10-bit). Note that on the left
hand side there is a toggle to turn all 8 inputs on or off, as well as a
resolution selector for all 8. The control for sampling interval control is immediately below the all-
input control. The minimum setting, corresponding to the maximum sampling rate, is 1 millisecond.
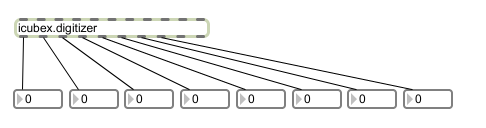
The sensor data is routed to the 8 outlets of icubex.digitizer, where it can be used by the rest of your patch. You can also include the plugin in a bpatcher. This and more is further explained in icubex.digitizer.maxhelp, which is included with the patch.


 LinkedIn group